Tuesday, October 29, 2013

Cowboys, Sugar & Spice, and Hand Dyed Punch Needle Thread

 
As October comes close to being over and the prairie winds continue to blow warm yet with a hint of coolness.....I wanted to try a bit of dyeing for some needle punch projects.
 

I soaked my wool thread with a bit of suds.


Gathered up my needed supplies and went from off white to a wonderful rich color of walnut browns with a hint of  dark blues, nutmegs, and autumn reds.  Wonder what all kinds of projects will come of this wool thread?
 

Picked up this lil' cowboy from school today and of course we had to play a little baseball.  I pitch to him and he knocks it over the fence.  I get in a pretty good workout chasing balls.


When I'm not chasing balls I try to keep up with Miss Eva.  She is now 18 months old and loves to be outside.  We are enjoying as much time as we can outside before Autumn is gone and winter arrives!
 
 
Happy Trails....Ginger

Friday, October 18, 2013

Sunflowers, Cats, Pumpkins

Wow has the weather cooled off here in Oklahoma.  Perfect weather for an evening fire and a little punch needle. 

 
Sunflowers, cats, and pumpkins are getting done.  Just like some pumpkin stems and background and then a good pressing and deciding what to make them into!
 
Hope you are enjoying your Autumn days.  If you are in the area we will be meeting on October 26th here at the farm for a day of rug hooking, punch needle and stitching!
 
Happy Trails....Ginger

Thursday, October 10, 2013

Finishing Your Needle Punch Projects


I know I have a LOT of needle punches to finish but it won't take too long :)
 
I apologize for the shaky video and not speaking loud enough.


A few little hints on finishing your needle punch pieces.
Steam press them once you are finished punching.  Let dry and then decide what you plan to do with your piece if you haven't already.
If your piece may possibly be used as something that may get washed you will want to cut around the outside loops about 3/4 inch and then baste the weavers cloth  to the back of your work.  Finish by adding wool or fabric to the back and then add some trim around the edge using things such as jute, wool yarn, wool strips, etc.
For things such as pins, magnets and some projects you may want to place on paper mache or wood boxes you can simply brush some glue onto the back of your work let dry and carefully cut around the edge once it is dry being careful not to cut into the punched loops.  Add wool or fabric to the back, finish off the raw edge around your piece with whip stitching over some  yarn, jute, or wool strips placed next  to the edge.  You want to hide that raw edge of weavers cloth.
 
Just a couple of easy ways to finish up some needle punch projects!
 
Happy Trails....Ginger

Wednesday, October 9, 2013

Free Doodle and Birthday Celebrations!

 
A free fall doodle just for you!  Wishing each of you a happy Autumn :)

 
Our lil' grandson Sloan turns 6 today!  Time passes so quickly love my grands :)

 Funny how he is in to ninja turtles I remember well how my kiddos liked them too when they were young.


Our son Dan had a birthday on Monday hard to believe he is now 30!  I did get him and our daughter Jenn to stop long enough for a rare picture.  We have a new lil' grand on the way next April.
Eva Mae will be a big sis and Sloan will have a new cousin to play with.


We had a big moon bounce for the kids to play in and they had lots of fun jumping.

Good exercise for all the kiddos.


Time for some cake and ice cream!
 
Happy Trails....Ginger

Tuesday, October 8, 2013

Beginner Needle Punch


While at Silver Dollar City I did a LOT of needle punching.  There are a lot of new needle punchers from the ages of about 5 years old on up that did very well learning how.  Yes 5 years old!  Lots of children stopped by and wanted to try needle punching, rug hooking, and oxford rug punch. 

If you have ever wanted to try needle punch it really is very easy to learn.  Thread your punch needle, grab some weavers cloth and put it in a hoop or on a frame and draw on a pattern and your on your way. 

A few little helpful hints....make sure your thread, floss, or yarn glides smoothly through your punch needle.  Never force it through if it won't go it may have a knot, fuzz inside the needle, or may just be too thick for your punch needle.

Begin by doing small areas that are detailed then fill in around them to hold them in place.  Letters should be drawn on backwards.  I like to take a sharpie and draw them on the right side then turn my weavers cloth over and retrace them on backwards.  That way they get on to the pattern right where I want them and don't struggle trying to draw them backwards.

Leave just a tiny tail of floss out when you begin to punch.  Most of the time I set my ultra punch on the #3 setting unless I wanted to add some dimension such as flowers, sheep, etc.  When you start punching you need to punch your needle all the way down into the fabric and then as you come up with the needle come out of the fabric and barely scratch the surface moving your needle just a fraction and going right back down into the fabric all the way down as far as the needle will go...this makes your loops all the same height on the front side.  Get into the habit of going all the way down each time. You will also want to keep your rows side by side with very little space between.

You want those loops nice and compact on the front side!  When you do little things such as eyes don't worry about that at first they don't look right once you add the background around them they will shape right up.

Needle punch is a fun and easy craft that will have you making lots of fun things in just a few hours. 

Happy Trails....Ginger

Monday, October 7, 2013

Pattern Transfer method for Needle Punch


Are you a beginner at needle punch?  This is a simple easy way to transfer patterns to weavers cloth.  I also included how to hoop up your weavers cloth using a Susan Bates hoop la embroidery hoop and then my favorite a gripper strip frame.  So if your brand new to needle punch let's get started!


Happy Trails....Ginger

Thursday, October 3, 2013

Threading A Needle Punch

While at Silver Dollar City I demonstrated needle punch and for a lot of folks it was brand spanking new!  So I will be adding some simple little videos on needle punch, oxford punch and rug hooking in the next few weeks.

For those new at punch needle I hope this helps :)  Also, if you are wondering about what is on my punch needle I made a little cushion of coflex tape it works great as a pencil type grip for my punch needle!


Happy Trails.....Ginger

Tuesday, October 1, 2013

Back from the 1800's!


What a grand time Silver Dollar City was.  Sometimes it is nice to slow down a bit and spend time living a simpler life. 
 
Frank Smith twirled his rope and included Ann and I in his lasso for the crowd.  He works at Silver Dollar City and cooks pork rinds.  He has been using a lasso since the age of 7.  He was a bronc rider in rodeos and was also a school teacher.  The folks that work at Silver Dollar City enjoy entertaining the crowds and are some of the nicest people you will ever meet!
 
I've had a chance to get home and unpack  and see the grandkiddo's and boy did this MoMo miss them.  I'm getting back into the swing of things and hope to do a few instructional videos for beginning needle punch and oxford punch to help out some new punchers :) So check back soon!
 
Thanks to all that stopped by the booth it was a great experience and I plan to go back again next year.
 
Happy Trails.....Ginger


Thursday, September 5, 2013

Silver Dollar City

 
Well the time has finally arrived and we are set up at Silver Dollar City in Branson, MO.
It has been quite the experience and we have really enjoyed being a part of the 1800's!


Our booth is packed to the brim with lots of goodies!


Rug hooking, oxford punch, and needle punch supplies as well as lots of finished goods.
 

Pati  and Sandra were out for a couple of days and returned home but they will be back this weekend ready to help for the next 3 1/2 weeks.


Our booth gets changed around a bit everyday :)

Ann and I have been showing lots of kids how to hook and punch and surprisingly they caught on very quickly.

It has been very warm during several of the days but with lots of ice cold water we kept right at it!


If you get a chance and are in the area we would love to have you stop by for a visit!


Happy Trails....Ginger

Wednesday, August 7, 2013

A Quick Way to Bind A Hooked Rug

 
Here is another way I bind rugs.  I don't always serge around the edges but for this one I did.  You will want to leave about 1 1/2 inches all around the hooked piece to be folded in for binding.

Fold in up to the hooked row

Then fold over one more time.


Take a needle and thread and baste in place ..... it makes it a lot easier in the long run to do this step.


Now to make it simpler for your corners baste right up to them and leave them for last.


Fold in at the corner just as in the picture.
Then fold in one side

Then fold in the other side

With your needle and thread whip up the center


Lace it up with the needle and thread now repeat on each corner.
 
Now that all four corners are basted it is time to press.

Press it all around until it lies flat.
 

Now time to whip that rug.  I am using 4 ply wool yarn that I have hand dyed and a big eye tapestry needle.
 

You want to come up with the needle right next to the last hooked row.  You will hide your tail of your yarn as you whip the rug.
 

Now go down next to the last loop of the hooked row.

Come around with the yarn and right back down next to the last hooked row again.  Repeat over and over laying the yarn right next to each other.  DO NOT pull tight.  You just want it to lay nice and even.

Nice and even and not too tight :)


Now just keep whipping right down the row keeping your needle right next to the last hooked row.


This is how the back should look it is also right next to the last hooked row.


When your yarn gets short run the needle back into the whipped row and hide the tail.
Clip off any extra bit of yarn.


Start again with another piece of yarn hiding the tail in the whipping and continue on.
 

As you approach the corner go slow and take your time.  You may need to add 2 or 3 stitches in the same hole as you yarn over.  Just lay them side by side as you go around the corner.


This is how it should look.
 

After you have rounded the corner just keep on whipping side by side.


This is the back of the rug  showing the corner I just whipped.


Well that is it.....easy peasy isn't it!!!!!
 
I'm not going to finish this one just yet.  I need a few rugs to show how to bind when we are at Silver Dollar City in a couple of weeks.  So there will be plenty of time to finish this one up!
 
This lil' gal has been over visiting in the afternoons as Sloan is gone to visit his other Grandma before school begins for him next week.  She finally has a chance to play a game all to herself :)  How quickly they learn to make things work.  Don't you just love lil' fingers and toes!!!!!!
 
 
Happy Trails......Ginger



Friday, August 2, 2013

Binding Can BE.......

Relaxing once you figure it out.  Now let me be the first to say I have tried all kinds of binding techniques and I have a couple of favorite ways.  One is with binding tape which I have found to be one of the most easiest once I learned how to do it.
I admit I once had a pile of over 40 hooked pieces needing bound all because I wasn't sure how to finish them without getting discouraged.
So I just kept on hooking and let them pile up.

This method I am using on this oxford punched rug does not use binding tape.  I simply just trimmed the monks cloth folded it in and sewed a simple running stitch to hold it in place and rounded the corners a bit with needle and thread.


Here is the backside of the rug.  See how it adds the look of almost another row to the rug.
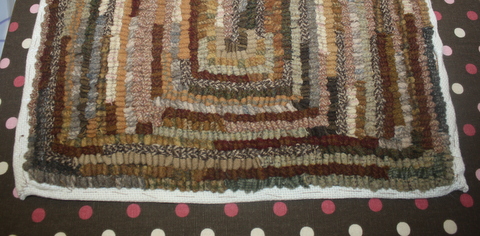
I have another rug I need to bind and I will try to take step by step photo's of how to do this.  Maybe it will give you another option to binding if you have never tried this.
 
I am binding this with the same wool yarn I hand~dyed for the punching.  It is a 4 ply wool yarn and it binds it very quickly :)
 
Enjoy your weekend and take a few minutes to slow down in this busy world we live in and just enjoy the simpler things of life!  You will be glad you did :)
 
Happy Trails......Ginger