

Well I've been known to have a pile of hooked rugs and mats to bind. I've tried binding them every which way and this is my favorite. With this method I whittled down a pile of 40 yes 40 rugs and mats last year! So gather up your wool yarn, a big eye needle,a few pins, and a sharp pair of scissors and let's get started.
First thing I did was trim up around my mat leaving about 1 inch of backing all around. I cut the corners at an angle to reduce the bulk.

You want to turn your piece over and lay it on a table...you want a flat surface to work on. Fold your backing over as shown in the picture above and pin your twill tape to the mat or rug. I only use about 3 or 4 pins and move them as I get each area bound. You DON'T want to start near a corner...but somewhere in the middle. I usually start in the middle on the bottom.

Since this is a small mat I went ahead and pinned just past the corner as you will see in a few photo's down. Now if you have ever bound a quilt this part will come easy....take that cut off corner and fold in as seen in the above photo. (As you can see I have farmgirl hands and could sure use a manicure)

Next you will fold in the bottom edge at an angle we are making a mitered corner.

Next fold in the side to the left...it doesn't have to be perfect but try to get them pretty close.

Now take your twill tape and lay it right on top of the backing that is mitered.

Fold the twill tape back on itself.

Now you will slightly turn it at an angle and start going up the side of the mat with the twill tape....see photo.

You will want to pin the corner right in the center of the turn.

Pin the twill tape in one more place just after the corner to hold it in place. It takes a bit of practice so don't worry you will get it!

It's time to grab that big~eye needle and the yarn and start binding.

To hide my yarn tail I run it through the backing and hide it on the inside. My needle comes out right beside where I hooked or oxford punched the last row.

I then put my needle throught the twill tape and then down through the backing coming up right at the edge of the last hooked row. It hides all the backing.

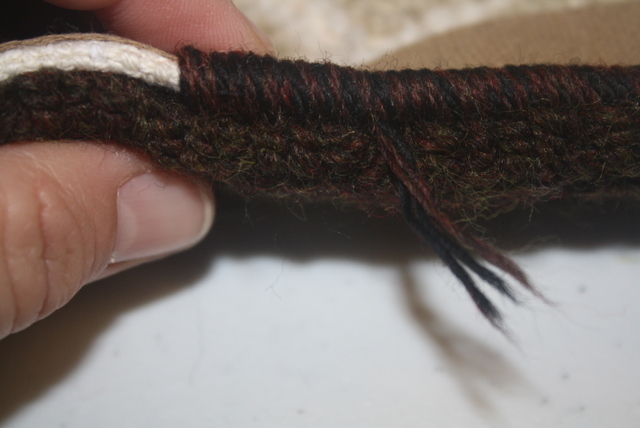
Continue whipping the yarn through the binding and backing with the yarn touching each other but not overlapping.

I'm running out of yarn...no fear just hide that tail right inside by putting the needle through the whipped area and pulling the yarn inside.
Unthread the needle and just cut that little yarn tail off close to where you whipped.

Load your needle again with yarn and hide that new beginning tail just like when we started with your needle coming up right beside the last whipped stitch. Your ready to go again :)

Oops there is a corner ahead (this use to be my worst area) but with this method it is pretty easy just take your time!

I whip right up to that folded corner then with the next stitch I catch into the folded area. Now I might put 3 stitches in that same hole at the top of the twill tape as I make my way around. Don't overdo it on the stitches...go slow and if you need to after the 3 stitches move them over by taking your needle and raking across them to fill the area. If you need another stitch to cover that corner put one in.
You want your stitches laying side by side not piled on top of each other.
With a little practice you will get it. I added a picture above and below for the corner.


Now do you feel like singing? You made it around the corner...hooray! Now let's continue up this side. Take those pins out from where you just bound your mat and continue putting them in the twill tape ahead.

We have made it around all 4 corners and are seeing the end in sight. Take the twill tape and cut it off leaving about an inch to fold back underneath itself and lay it on top of the beginning twill tape...pin it down to hold it.

Continue whipping your rug through all the thickness until you reach the very first whipped stitch. Run your needle and yarn through the whipped stitches and cut off the yarn.
Congratulations you have your rug whipped and we have just a little more finish work to go.

If your backing is still sticking out and not under your twill tape....simple grab a pair of scissors and fold back the twill tape and carefully cut away a portion of the monk's cloth or linen.


Now grab a sewing needle and some thread. Your ready to put the finishing touches on your mat or rug. Begin by sewing the twill tape together where they are joined.

Continue sewing through the twill tape at the top edge and into the hooked mat or rug.

I sew the corners up and then back down and contine sewing the twill tape down until I'm all the way back around.

Sometimes I add a fabric tag and there are times I just grab my sharpie and sign it right on the twill tape.

Now it's finished! Hope you enjoyed this little tutorial....It's the easiest way I have found to bind and I know there are a LOT of great methods for binding so give a few of them a try and see what works best for you.
Happy Trails...Ginger
35 comments:
OH Thank you Ginger, I think this is the best I have seen, I have not really known how to do the tape. I think I start hooking slower and slower when I know I will be binding a rug just because I haven't really known how to do it.
It looks so nice.
Thank you so much, now I won't be afraid and I can keep coming back and looking at yours now.
Ginger ~
Thanks for the binding lesson. I've not tried that method but you make it look so easy! What kind of yarn do you use?
Hugs :)
Lauren
Great tutorial! I was about 18 years old the last time I hooked a rug - it was never finished because I didn't know how to finish it up. Unfortunately, I have absolutely no idea what happened to the rug (I'm 56 now!) but maybe I'll give rug hooking a go again with your wonderful tutorial! Thanks so much for posting this information.
This is a wonderful tutorial Ginger! So clear and easy to follow! You make it look so darn easy!! LOL! I have never whipped a rug to this day to finish but now I may try it since your directions are so fantastic!!
Thank-you so much! Your hands are beautiful and working hands are the ones I love the most!
Hugs!
Cathy G
Ginger, thank you for taking the time to post this tutorial. I think it is absolutely wonderful. ~Ann
Great Tutorial Ginger. Thanks for taking the time to show this.
hugs
cyndi
What a great tutorial and the pictures were excellent. It has inspired me to finish three rugs that have been unfinished for 10 yrs. Thanks!!!!
Thanks so much Ginger! Your tutorial is VERY clear and I think I may try this technique on my next mat. I do like the idea of having the space on the twill tape for signing and adding a note too! Thanks so much for taking the time to post this info! Love the little posie design too! :-)
Thanks, Ginger...directions I can actually understand! Have always been intimidated when it comes to using tape to finish a rug, but might give it a try now. Great tutorial.
Robyn
Thank you so much Ginger. I am such a visual person and you have given great photos with each of your steps. I have never used the twill tape and want to use it on my BHR challenger rug. I am going to post a link to this post on my dimensional rug hooking blog to. Thanks again for this great tutorial.
awesome, thanks much!
Thank you for this! I haven't ever used the tape because I couldn't grasp how it was done. Now I may just have to give it a try!
Ginger, thank you so much for posting!! Fantastic pictures!! I have three rugs waiting to be finished!! I am excited to finish now!! Thank you again!!
"hooked on rug hooking"
Mona
Wow, this is a fabulous tutorial! I feel like singing just reading it and printing it out for my file. It's the best I've seen-- so easy. Thank you so much for taking so much time for something that stumps alot of us!
That doesn't seem scary at all. :-) Now to get my you-know-what in gear and finish something already so I can bind it, lol. I also was gifted about 6 rolls of twill tape and had no idea how to use it. Thanks!
Hi Gingergirl!!!!!!
first, I want to say that 'FARMGIRL Hands" are beautiful, and just reflect our love for what we do...be proud of them :)))))
2nd, thank you for taking the time to snap all of those pics, write all of those words and share your thoughts with us all...it really helps with visuals are yours are perfect!
Happy Spring to you from Notforgotten Farm!!
I agree with all the great things everyone else said, AND I usually don't want to sew on tape, and you didn't! This is a very doable method and I noticed you used verigated yarn, which of course, made me think of you and Patijane and I at Tyler.
Thanks for such great directions,and pictures, and I agree with Cathy G. Working hands are the most beautiful, especially when they are connecting to such a generous heart! Jonut
Thanks for the tutorial.
Now it all makes sense to me.
Ginger,
The morning you posted this I was on my way to a major hook-in. I was bringing a rug to bind. So, early that morning, I'm carefully studying your fab tutorial, grabbed the pin cushion, binding tape, needle, and yarn. Off I went. Well, let me tell you I had more people come up to me to ask how I was doing the binding. So, I was excited to tell them that I got the idea just that morning from you. Many people wrote down your blog address and were eager to go check it out. One lady even took a picture of the edge. It's a great way to bind...my corners looked wonderful. I had such fun talking up your blog!!
Hugs,
Courtney
You better believe I will be bookmarking this post. Thanks so much for the help.
Hi Ginger,
I may have to try this one ... now I have to try to figure out which one of my mats I will try it on ...
Yes, you are not the only one who hooks and doesn't finish!
Bad habit, I must try to kick.
Thanks for the great tut!
Teri
Binding a hooked rug is what always stopped me from doing one. Or rather not knowing how to bind one. Thank you so much for this information!
How timely since I just finished a hooked rug. Can't wait to try this technique..thanks, thanks, thanks
I can't thank you enough for this tute. Will it work on half circle or circular latchet hooked rugs as well?
Ginger, thanks so much for posting this. I also have been dreading doing binding because I couldn't figure out how to get the yard to look so good. I have mitered corners on quilts so your directions make good sense to me.
Off to do some binding!
Linda
Great post! Thanks for the details and great photos that explain it all so well. It's helping me with my first rug that I finished hooking last night. So this is timely for me, too. Thanks!!!
Wonderful tutorial Ginger....I'm always curious about the myriad of ways everyone binds things. I, personally, have always loved the binding part....So relaxing and mindless to do. I used to use the twill binding tape, but don't any longer, since none of my rugs/mats go on floors. And I've found that my favorite method is to roll the fabric forward and whip....Easy, peasy, and DONE!! But yours makes for a beautiful finish....Wish I would have had a resource like this when I started hooking... Thanks for the wonderful share! Smiles & Hugs ~ Robin
Thank you so very much!
With your fabulous binding tutorial I have now finished my very first primitive hooked piece!
Diane in IL
Thank you Ginger,
I usually bind first and then put my tape on, you've just saved me a step by this method.
Cheryl in Canada.
Great consise explanation that should be of big help to many. You are the best Ginger!
Carol
Thanks! Helped explain a lot. Didn't know what type of thread to use.. yarn!.. duh. Thanks again.
Excellent tutorial, Ginger!
I bind my mats the same way as you do yours except I've been adding cording around the perimeter and then fold the linen over it. After seeing yours, I think I just might eliminate the cording step because yours looks just as nice, if not nicer in that there's less bulk at the edge.
Thanks so much for sharing.
Best tutorial that I have seen. It's done so well and simple that any beginner would have no difficulty understanding, and have the ability to do a nice finishing job.
Do you sew around the last row of hooking?
Thanks for sharing with us. Wren
Thank you this tutorial will help me bind my first "rug". As I sit here hooking I'm trying to figure out how I will bind this piece that is a wall hagning. I think this one might end up spending some time in a gallery before it ends up at home but the binding made me nervous till I read your tutorial.
this is my first rug and was scared to death about the binding im a 65 year old male and had no one to ask for help ,,thank you for your info ,,it will come in handy
Post a Comment