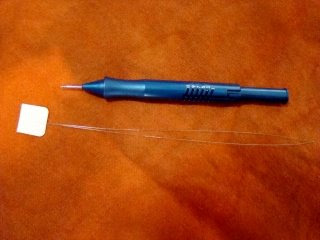
One step threading for your cameo punch needle. Begin by gently pulling off the white tab at the end of the threader.

Once the tab is removed it will have one closed end and one end will be the open end of the two wires.

Begin by placing the closed end of the threader into the needle end of the punch needle. Run the threader completely to the top open end of the punch needle.

You will then place your floss into the threader leaving about a 1 1/2 to 2 inch tail of floss.

If you are using 6 strands of floss be gentle so not to break your threader. Now begin gently pulling your threader down through the punch needle.

Here we have the thread almost out....Continue pulling until the double thickness is all the way through...but make sure you don't pull hard you don't want to break your needle.

Once the double thickness of the floss is through the punch needle pull about 4 inches more through for the next step. Next you will place the two open ends of the threader through the bevel side of the needle eye.

I gently bend the needle threader...just make sure you don't bend it too much. It straightens out just fine unless you get it into a bind. If you do just pull out a little more floss and bend the threader again and place in the eye of the needle.

Now pull the floss through the eye of the needle. Don't force the thread just gently pull until the double thickness is completely through the eye.

Once you are to this point remove your needle threader.

Shorten the tail on your floss and your ready to begin punching!
So now you have removed that little white tag...the only problem is you might have a little bit of trouble finding your needle threader. You can keep it attached to a magnet...or like me you have to look for it every once in awhile.
Hope this has helped you save a little time in your needle punching projects.
Happy Trails....Ginger
6 comments:
I do it like that too! Works like a charm! I keep one of those flat magnet sheets on my table when I'm doing needlepunch. A lot of companies given them away with their business information or calendar. I just put it upside down, LOL! Perfect parking place for the threaders.
I do it this way too! Thanks for posting the great pics for everyone to see!
~ Laurie
thanks so much for the tutorial!! i am really wanting to try needle punch. can you give me some inof on the basics, like fabrics, suppliers, etc?/
thanks so much!!
kim
p.s. i primmed some flosss yesterday.your idea was great!!
Kim ~ In response to the question about fabrics...I use weavers cloth. It is a tightly woven fabric. You can find it at Wally World if they still carry fabrics or you may look at your local fabric stores. You can also punch on other fabrics but will have to iron a stablizer on the back. Then just draw your pattern onto the stabilizer and beginning punching.
Hope this helps.
:)Ginger
thanks ginger! our walmart is still carrying fabric, at least for now. i will definitely check it out.
Tell us if you use a frame or a hoop. I'm curious! ;-)
Post a Comment